How-to: Custom Components (objects)
By default, each object on a form with GRID view is displayed on the form as a flat table with columns. However, it is possible to create your own components in the platform to visualize the list of objects.
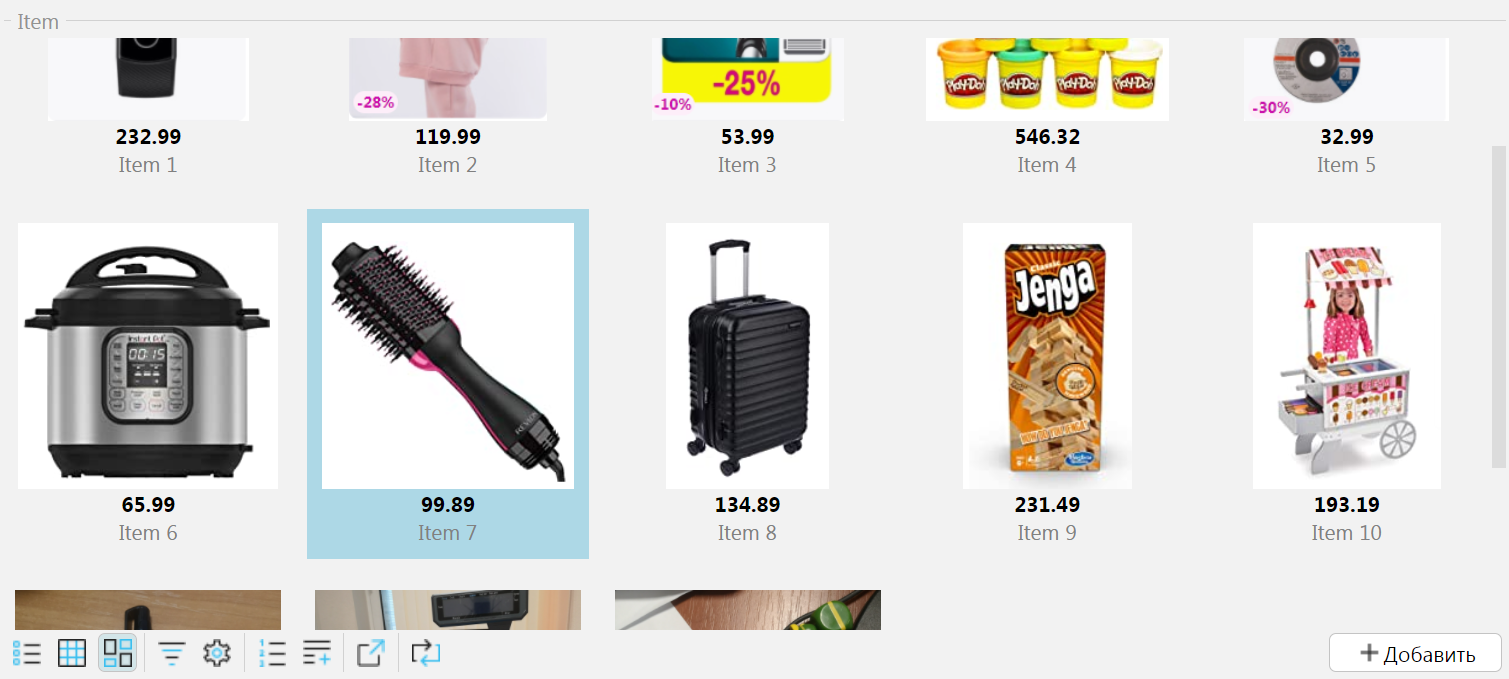
As an illustrative example, let's consider the task of displaying a list of products with images in the form of "tiles".
Domain Logic
First let's create classes and properties of items, as well as edit form:
CLASS Item 'Item';

name 'Name' = DATA STRING (Item) NONULL;
price 'Price' = DATA NUMERIC[12,2] (Item) NONULL;
image '' = DATA IMAGEFILE (Item);

FORM item 'Item'
    OBJECTS i = Item PANEL
    PROPERTIES(i) name, price, image

    EDIT Item OBJECT i
;

DESIGN item {
    OBJECTS {
        MOVE PROPERTY(image(i)) {
            fill = 1;
        }
    }
}
The name, price and image must be specified for each item.
Interface
Let's create a form with a list of items. To do this let's add to the form an object Item, its properties, and actions to add, edit, and delete:
FORM items 'Items'
    OBJECTS i = Item CUSTOM 'itemCards'
    PROPERTIES(i) READONLY image, price, name
    PROPERTIES(i) NEWSESSION new = NEW, edit = EDIT GRID, DELETE GRID
;

NAVIGATOR {
    NEW items;
}
The keyword CUSTOM specifies that not the standard tabular interface should be used to draw the list of items, but the components created by the function itemCards. Let's declare this function in the file itemcards.js, which we'll place in the folder resources/web. It will return an object consisting of two functions: render and update.
The function render takes as input the controller and the element inside which the new elements necessary to display the data are to be created:
render: (element, controller) => {
    let cards = document.createElement("div")
    cards.classList.add("item-cards");

    element.cards = cards;
    element.appendChild(cards);
},
In this example we create a new div cards, remember it, and append it to element.
To update the displayed values, the platform will call the update function each time, and the same element will be passed to it, as in the render function, and the list of objects:
update: (element, controller, list) => {
    while (element.cards.lastElementChild) {
        element.cards.removeChild(element.cards.lastElementChild);
    }

    for (let item of list) {
        let card = document.createElement("div")
        card.classList.add("item-card");

        if (controller.isCurrent(item))
            card.classList.add("item-card-current");

        let cardImage = document.createElement("img")
        cardImage.classList.add("item-card-image");
        cardImage.src = item.image;
        card.appendChild(cardImage);

        let cardPrice = document.createElement("div")
        cardPrice.classList.add("item-card-price");
        cardPrice.innerHTML = item.price;
        card.appendChild(cardPrice);

        let cardName = document.createElement("div")
        cardName.classList.add("item-card-name");
        cardName.innerHTML = item.name;
        card.appendChild(cardName);

        element.cards.appendChild(card);

        card.onclick = function(event) {
            if (!controller.isCurrent(item)) controller.changeObject(item);
        }
        card.ondblclick = function(event) {
            controller.changeProperty('edit', item);
        }
    }
}
Because the update function is called whenever the data changes, the first thing that happens is that all previously created elements (namely, item cards) are deleted.
This example uses the simplest update scheme, but if necessary, it can be optimized by updating the DOM only for changed values. To do that, the controller has getDiff method, where you pass a new list of objects as a parameter. This method will return as a result an object with arrays add, update, remove, which store added, changed and deleted objects respectively. Example:
let diff = controller.getDiff(list);
for (let object of diff.add) { ... }
for (let object of diff.update) { ... }
for (let object of diff.remove) { ... }
After removing the old elements, for each object in the list array a div card is created, in which the desired display elements of each property are placed. The names of the object fields correspond to the names of the properties on the form. The isCurrent method determines which object from the list is current.
At the very end of the function, mouse click handlers are added to the item card.
On a single click changeObject method is called on the controller, which changes the current object. The second parameter (rendered) is not specified (i.e. it is assumed to be false), which means that the server must eventually call the update function with a new list of objects (probably the same one). Since the value of the isCurrent method will change, re-creating the item cards will change the currently selected object in the interface.
On double-click, the changeProperty method is called, which changes the current value of the edit property for the object passed in the second parameter. Since edit is an action, the third parameter, the value by which the current value of the property should be changed, is not passed, and the action will be called instead of the change. In this case the item editing form will be opened.
To combine the render and update functions into one, itemCards function is created, which returns them within the same object:
function itemCards() {
    return {
        render: function (element, controller) => {
            ...
        },
        update: function (element, controller, list) {
            ...
        }
    }
}
To complete the design setup, create a file itemcards.css, which we will also place in the resources/web folder:
.item-cards {
    display: grid;
    grid-template-columns: repeat(auto-fit, minmax(150px, 1fr));
    grid-auto-rows: 200px;
    grid-gap: 10px;
}

.item-card {
    cursor: pointer;
    display: flex;
    flex-direction: column;
    overflow: hidden;
    align-items: center;
    padding: 8px;
}
.item-card-current {
    background-color: lightblue;
}

.item-card-image {
    flex: 1;
    min-height: 100px;
}

.item-card-price {
    font-weight: bold;
}

.item-card-name {
    color: gray;
}
In order to load created js and css files when the page opens in the browser, you must add their initialization to the action onWebClientInit by adding the file name to the onWebClientInit(STRING) property. A numeric value is needed to specify the order of loading:
onWebClientInit() + {
    onWebClientInit('itemcards.js') <- 1;
    onWebClientInit('itemcards.css') <- 2;
}
The resulting form will look like this:
