How-to: Custom Components (objects)
By default, each object on a form with GRID view is displayed on the form as a flat table with columns. However, it is possible to create your own components in the platform to visualize the list of objects.
As an illustrative example, let's consider the task of displaying a list of products with images in the form of "tiles".
Domain Logic
First let's create classes and properties of items, as well as edit form:
CLASS Item 'Item';

name 'Name' = DATA STRING (Item) NONULL;
price 'Price' = DATA NUMERIC[12,2] (Item) NONULL;
image '' = DATA IMAGEFILE (Item);

FORM item 'Item'
    OBJECTS i = Item PANEL
    PROPERTIES(i) name, price, image

    EDIT Item OBJECT i
;

DESIGN item {
    OBJECTS {
        MOVE PROPERTY(image(i)) {
            fill = 1;
        }
    }
}
The name, price and image must be specified for each item.
Interface
Let's create a form with a list of items. To do this let's add to the form an object Item, its properties, and actions to add, edit, and delete:
FORM items 'Items'
    OBJECTS i = Item CUSTOM 'itemCards'
    PROPERTIES(i) READONLY image, price, name
    PROPERTIES(i) NEWSESSION new = NEW, edit = EDIT GRID, DELETE GRID
;

NAVIGATOR {
    NEW items;
}
The keyword CUSTOM specifies that not the standard tabular interface should be used to draw the list of items,
but the components created by the function itemCards. Let's declare this function in the file itemcards.js, which we'll place in the folder resources/web. This is the no-build path — a plain .js file, no JSX or bundling; see How-to: Custom client JS modules for where custom JS goes and for the with-build alternative.
It will return an object consisting of two functions: render and update. It is the function that is registered: the platform itself calls itemCards() and takes render and update from the result, so the object with these functions cannot be registered without the wrapping function.
The function render takes as input the controller and the element inside which the new elements necessary to display the data are to be created:
render: (element, controller) => {
    let cards = document.createElement("div")
    cards.classList.add("item-cards");

    element.cards = cards;
    element.appendChild(cards);
},
In this example we create a new div cards, remember it, and append it to element.
To update the displayed values, the platform will call the update function each time, and the same element will be passed to it, as in the render function, and the list of objects:
update: (element, controller, list) => {
    while (element.cards.lastElementChild) {
        element.cards.removeChild(element.cards.lastElementChild);
    }

    for (let item of list) {
        let card = document.createElement("div")
        card.classList.add("item-card");

        if (controller.isCurrent(item))
            card.classList.add("item-card-current");

        let cardImage = document.createElement("img")
        cardImage.classList.add("item-card-image");
        cardImage.src = item.image;
        card.appendChild(cardImage);

        let cardPrice = document.createElement("div")
        cardPrice.classList.add("item-card-price");
        cardPrice.innerHTML = item.price;
        card.appendChild(cardPrice);

        let cardName = document.createElement("div")
        cardName.classList.add("item-card-name");
        cardName.innerHTML = item.name;
        card.appendChild(cardName);

        element.cards.appendChild(card);

        card.onclick = function(event) {
            if (!controller.isCurrent(item)) controller.changeObject(item);
        }
        card.ondblclick = function(event) {
            controller.changeProperty('edit', item);
        }
    }
}
Because the update function is called whenever the data changes, the first thing that happens is that all previously created elements (namely, item cards) are deleted.
list receives only the read page, not the whole set of objects: for an object group with the CUSTOM view type its default size is 1000 objects. For the view to receive all objects of the group, specify the PAGESIZE 0 option (read all objects) in the OBJECTS block.
This example uses the simplest update scheme, but if necessary, it can be optimized by updating the DOM only for changed values.
To do that, the controller has a diff method, which takes the new list of objects and a handler function. The method compares the passed list with the list from the previous call (the first call compares with an empty one) and delivers the changes as a sequential script transforming the old list into the new one: the handler is called for every change and receives its type ('add', 'update' or 'remove'), the change position in the list being transformed (for 'add' and 'update' it coincides with the object's position in the new list), and the object itself (the removed one for 'remove', the new one for the other types); the passed list is then remembered. Two optional flags refine the comparison: with noDiffObjects one object's row is never turned into another's — such a pair yields 'remove' and 'add' instead of 'update'; with removeFirst the handler receives all removals first — with positions in the previous list — and only then the additions and updates.
Example:
controller.diff(list, (type, index, object) => {
    switch (type) {
        case 'add': ...; break;
        case 'update': ...; break;
        case 'remove': ...; break;
    }
}, true, true);
The clearDiff method resets the remembered list — it is called in the component's optional clear function, invoked when the view is cleared with the same element and controller, so that the next rendering starts from an empty state.
After removing the old elements, for each object in the list array a div card is created, in which the desired display elements of each property are placed.
The names of the object fields correspond to the names of the properties on the form. The property values are converted to JS values in the same way as in the rows of a React view: for example, values of the date and time classes are passed as Date, and JSON — as a parsed object. The isCurrent method determines which object from the list is current.
At the very end of the function, mouse click handlers are added to the item card.
On a single click changeObject method is called on the controller, which changes the current object. The second parameter (rendered) is not specified (i.e. it is assumed to be false), which means that the server must eventually call the update function with a new list of objects (probably the same one). Since the value of the isCurrent method will change, re-creating the item cards will change the currently selected object in the interface.
On double-click, the changeProperty method is called, which changes the current value of the edit property for the object passed in the second parameter. Since edit is an action, the third parameter, the value by which the current value of the property should be changed, is not passed, and the action will be called instead of the change. In this case the item editing form will be opened.
To combine the render and update functions into one, itemCards function is created, which returns them within the same object:
function itemCards() {
    return {
        render: function (element, controller) => {
            ...
        },
        update: function (element, controller, list) {
            ...
        }
    }
}
To complete the design setup, create a file itemcards.css, which we will also place in the resources/web folder:
.item-cards {
    display: grid;
    grid-template-columns: repeat(auto-fit, minmax(150px, 1fr));
    grid-auto-rows: 200px;
    grid-gap: 10px;
}

.item-card {
    cursor: pointer;
    display: flex;
    flex-direction: column;
    overflow: hidden;
    align-items: center;
    padding: 8px;
}
.item-card-current {
    background-color: lightblue;
}

.item-card-image {
    flex: 1;
    min-height: 100px;
}

.item-card-price {
    font-weight: bold;
}

.item-card-name {
    color: gray;
}
In order to load created js and css files when the page opens in the browser, you must add their initialization to the action onWebClientInit by adding the file name to the onWebClientInit(STRING) property. A numeric value is needed to specify the order of loading:
onWebClientInit() + {
    onWebClientInit('itemcards.js') <- 1;
    onWebClientInit('itemcards.css') <- 2;
}
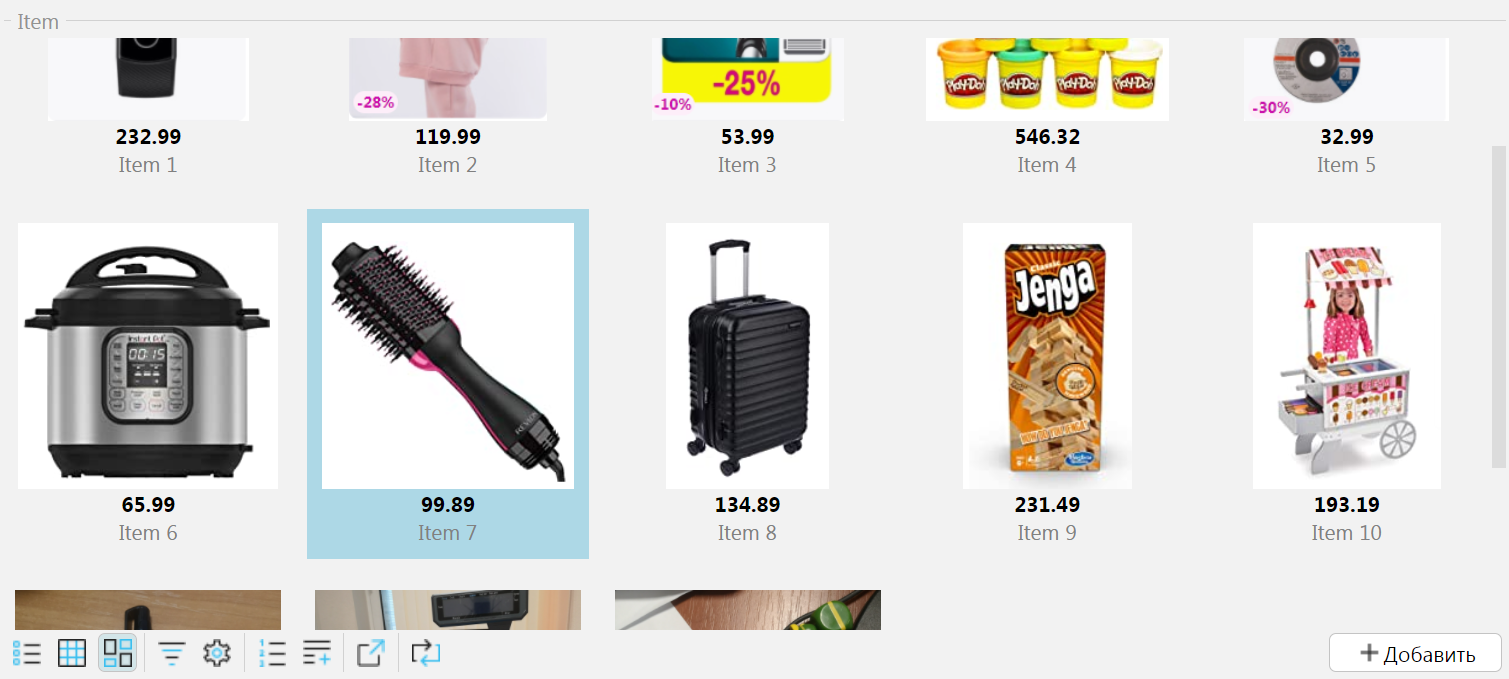
The resulting form will look like this:
Controller methods
The methods of the local controller passed to render and update, internal helpers aside (optional arguments are bracketed). Here property is the integration name of a property added to the form in this object group, and object is an object from the list:
| method | what it does |
|---|---|
isCurrent(object) | whether the object is the group's current one |
changeObject(object[, rendered]) | set the group's current object (see above) |
changeProperty(property[, object][, value]) | set a property value, or exec an action — on the current object or a given one (see above) |
changeProperties(properties, objects, values) | several changeProperty calls in one request from parallel arrays |
getValue(property, object) | the current property value for the object |
getCaption(property) | the property caption |
isPropertyReadOnly(property, object) | whether the property can be edited: null — editable, false — read-only |
getBackground(property, object) / getForeground(property, object) | the cell background / text color |
getFont(property, object) | the cell font |
getPlaceholder(property, object), getPattern(property, object), getRegexp(property, object), getRegexpMessage(property, object), getTooltip(property, object), getValueTooltip(property, object) | the values of the property's design attributes of the same name |
getCaptionClass(property), getGridClass(property, object), getValueClass(property, object) | the CSS classes set by the design attributes of the same name |
getChangeKey(property, object) / getChangeMouse(property, object) | the key combination / mouse event set on the form to change the property |
getPropertyCustomOptions(property, object) | the value of the property's OPTIONS option (a parsed JSON) |
getPropertyValues(property, value[, mode], ok[, fail][, count]) | a server suggestion list for the property's values |
diff(list, fnc[, noDiffObjects][, removeFirst]) / clearDiff() | compute the list changes (see above) |
setBooleanViewFilter(property, pageSize) | filter the view by the condition "the property value is true" |
setDateIntervalViewFilter(startProperty, endProperty, pageSize, start, end) | filter the view by a date interval |
getColorThemeName() | the current color theme name: 'LIGHT' or 'DARK' |
form | the form controller |
The value-or-row guess in changeProperty, the value formats, and the name qualification rules are the same as in the form controller's method of the same name; a property that is not one of this group's columns is passed by changeProperty to the form controller, which resolves it form-wide. changeProperties applies several changes in one request — for example, the built-in Gantt chart view changes both dates at once when a task bar is dragged:
controller.changeProperties(['start', 'end'], [task, task], [newStart, newEnd]);
getPropertyValues uses the same mode values and result format as the form controller's method of the same name, but the property is resolved among this group's columns, and the lookup runs for its current object:
controller.getPropertyValues('name', query, result => { ... });
setBooleanViewFilter and setDateIntervalViewFilter set a server view filter and the page size pageSize: the next update call receives an already filtered list. setBooleanViewFilter keeps the objects whose property value is true. setDateIntervalViewFilter keeps the objects whose period from the startProperty value to the endProperty value intersects the interval from start to end (the values are JS Dates; when endProperty is null, both ends of the period are taken from startProperty); this is how the built-in calendar view reads only the events of the visible date range.
The display getters let the component use the design attributes set on the form: for example, the built-in chart view builds its datasets taking the column captions and colors from getCaption, getBackground and getForeground.
Calling the server
A custom object view calls back into the server through the form controller: reached as controller.form from the view's local controller, as props.controller in a React view, or as the controller passed to an INTERNAL CLIENT function (the last argument, after the converted call parameters). Its exec / eval / evalAction / change methods each run on the server and return a Promise; their signatures are in Calling the server. The rest of this section covers how those server calls behave — result conversion, sessions, and the authorization gate.
The result is converted to a JS value:
| Server result | JS value |
|---|---|
| number, string, boolean, or date scalar | a number, string, boolean, or Date |
JSON | a parsed object or array |
JSONTEXT, XML | the raw string |
a file — an EXPORT, an image, or a file-typed property | a download URL string |
a missing or NULL result | undefined |
Parameters are passed as plain JS values (a number, string, boolean, Date, or an object/array for a JSON parameter) and bound positionally. An lsFusion object cannot be passed — its numeric id is passed instead; when the parameter is typed by a class, the platform resolves the id to the object of that class. A row handle (row.objects) is not an object reference: for a class-typed parameter the call fails. An error — a missing action or property, a script error, or a runtime exception — rejects the promise with its message.
In a form the calls run in the form's session, so a change is visible to the following calls and is committed when the form applies. In the navigator each call runs in its own session, so a change is discarded unless the script applies it with APPLY, and a read sees the committed database state.
By default these calls are gated like the external HTTP API: with the default enableAPI = 0 a call is allowed only when the target action or property carries @@api (which also exposes it over HTTP), or the user has admin rights. To let a specific form's controller call selected actions/properties without that gate, list them in the form's CUSTOMS clause — the authorization becomes "the user can open this form" plus the explicit listing:
FORM order 'Order'
    OBJECTS o = Order
    PROPERTIES(o) number, note
    CUSTOMS round, format = formatSum, taxRate
;
Now controller.form.exec("round", 3.14159), controller.form.exec("format", 1990, "USD") and controller.form.change("taxRate", 0.2) work on this form without @@api or enableAPI (a React view calls the same on props.controller). Each entry may be renamed with an alias (format = formatSum), prefixed with ACTION to force the action reading, and fully qualified with a signature (round[NUMERIC]) to pick an overload; exec needs an action entry and change a property entry. Parameters are passed positionally by the caller as plain values — phase 1 entries are mostly primitive calls like these. The clause changes which calls are allowed, not how parameters are bound, and does not restrict the argument values a caller passes, so list only entries safe for any argument (forcing a parameter to the form's own object is phase 2). eval/evalAction run arbitrary script and stay under the gate. An end-to-end working example — one CUSTOM view calling actions with object, primitive, and JSON parameters, reading a RETURN result, and changing properties through CUSTOMS — is in How-to: Custom Components (server calls).
Prefer CUSTOMS over @@api for a call a custom view needs: CUSTOMS scopes access to this form, while @@api also exposes the action or property over the external HTTP API. Mark something @@api only when it is genuinely part of that API.